|
Heh, Greetings! Welcome to the new series; THL Fiery War Primers! In this series, we will bring you all you need to know about some of the strongest decks, from the best THL players, with new guides coming regularly. Our goal here is to bring you intel on the major aspects of a deck: core cards and card choices, piloting advice, advice when playing against it, and how it can fit into your THL lineups. We’ll bring you a different deck every week, based on meta trends. Scholomance Academy came out three weeks ago. After a first round of nerfs to Mindrender Illucia and Kael'thas Sunstrider, the meta is still fairly unstable, but a few decks are starting to look stronger than others. One deck that is coming out strong is Bomb Warrior. -Brought to you by LotusKnight and BZRK, edited & compiled by rebobson  Although Bomb Warrior is still a strong deck, it was even stronger on ladder two weeks ago. However, aggressive, weapon-based Rogue archetypes were simultaneously gaining traction, and the combination of Bomb Warrior and Weapon Rogue pushed other players to tech in cards like Acidic Swamp Ooze and Kobold Stickyfinger. As a result, an extremely anti-weapon meta emerged. The weapon hate has definitely died down a bit, but aggro decks are being refined, leaving Bomb Warrior in a solid - but not dominant - position on ladder. 1) What are the deck's matchups? Whenever considering a deck, one of the first things to look at is what the deck is favored and unfavored against. In any meta, a deck will have its stronger and weaker matchups, and knowing those should lead you to consider it in different ways. We will here present the main decks you will face, and how this deck performs against them. That being said, this deck has many different builds. Depending on the list you choose, its matchups should vary widely. In the following sections, we will go over all the main modifications players have been making to the deck, and which results should you expect to obtain from playing with the different packages. We here present some of the main matchups. These matchups are taken from HSReplay.net for the last 7 days, using only top 1000 Legend data: 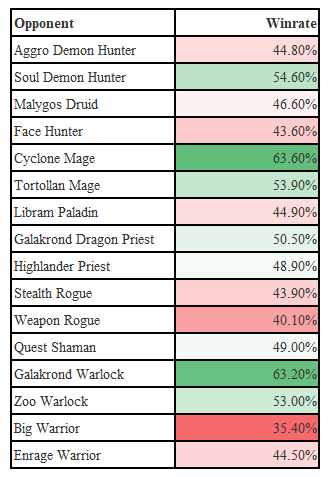 From these statistics, it can be seen that on average the deck performs well against control decks, such as Galakrond Warlock and Soul Demon Hunter, but poorly against aggressive decks that rely on burn to finish the game, such as Face Hunter and Weapon Rogue. We note these numbers were produced over a period of time where the ladder meta was heavily targeting Bomb Warrior, therefore they are lower than where they should settle over the next weeks. The builds of Bomb Warrior had not yet been heavily explored at the time, and we believe this will also shift many of these numbers significantly. 2) What are the core cards?Bomb Warrior is a control deck fundamentally composed of three different packages: A bomb package, a weapon package, and a survival package. Package 1: Bomb Package 
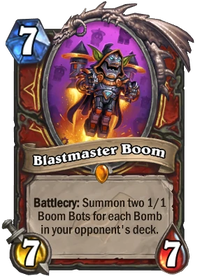
The bomb package is your primary win condition. This package consists of two copies of Wrenchcalibur, two copies of Corsair Cache, and one copy of Blastmaster Boom. Your objective with the bomb package is to have a win condition as a control deck; this package is the same as the one in Bomb Warrior prior to Scholomance Academy. Corsair Cache is used to tutor Wrenchcalibur, as well as give it an extra durability. Wrenchcalibur can be used to control the board or to deal face damage. The bombs are an additional source of delayed face damage, which may close the game quite fast against combo and some control decks. Blastmaster Boom is the second payoff for shuffling bombs in your opponent’s decks. Summoning four or six boom bots, as well as a 7/7 body, serves as a strong source of damage which often closes games. You will often play some area of effect card with Blastmaster Boom, to ensure your bombs hit your opponent’s face. Package 2: Weapon Package 
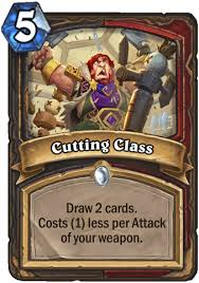
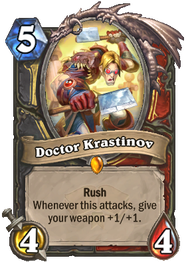
The second package that forms the Bomb Warrior deck has grown significantly with Scholomance academy. This is the weapon package. Your goal with this package is to have an infinite Wrenchcalibur, that can end the game consistently against any control deck. Both Upgrade! and Doctor Krastinov increase the attack and durability of your weapon, ensuring the success of your win condition against control decks. Cutting Class allows you to refill your deck for a low cost, refueling after you spend your low cost removal or upgrade cards. Hoard Pillager gives you additional copies of Wrenchcalibur, allowing you to shuffle even more bombs into your opponent’s deck, and to replace your weapon after it is destroyed. Hoard Pillager can also work as a tech card if your weapon is affected by Acidic Swamp Ooze. Note that you will not always play two copies of each of these cards. The particular number of copies to be played depends on the other packages you opt to include, and will lead to different matchups against different decks. These choices will be discussed in detail in the next section. Package 3: Survival Package 
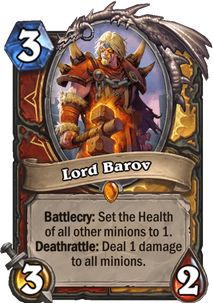
The final package is the survival package. The goal of this package is to survive for long enough so you can play your bomb and weapon cards and win the game. They also serve as removal, so you can attack your opponent’s face directly with Wrenchcalibur and not worry about trading as much. Shield Block, Shield Slam and Brawl are traditional Warrior cards that have been present since the deck’s first iterations, and indeed since Control Warrior has existed; your goal is to use them to remove threats as efficiently as possible. Bladestorm was a new addition to control Warrior that came out in Ashes of Outland, and provides a new way to remove multiple minions, while damaging all others and setting for your other removal cards. Deathwing, Mad Aspect is another very strong card, whose main function is to clear your opponent’s board while leaving a strong body behind, which your opponent will have to waste their resources to clear. The main new card introduced to this package with Scholomance Academy is Lord Barov, but what a card it is. Most likely the single strongest card in the deck, this card works as Equality with a 3/2 body, but can work as a full board clear when paired with any area of effect card or single target removal, such as Shield Slam or Risky Skipper. And it only costs 3 mana! Just craft this card already if you haven’t already. Stay tuned for Part 2 tomorrow, where LotusKnight and BZRK will be giving you more detail on how to tech the deck for different matchups, and Part 3 the following day, for details on how to approach different matchups, mulligan strategy, and some thoughts for the deck going forward. See you then!
0 Comments
Leave a Reply. |
AuthorThe THL blog is curated and edited by THL's Content Managers. All THL members are welcomed and encouraged to pitch ideas for articles they would like to see on the site. If you have an idea, please reach out to LotusKnight on Discord or via the THL Help email address: help@teamhearthleague.com Archives
December 2023
Categories
All
|

 RSS Feed
This website is not affiliated with Blizzard Entertainment.
Icons made by Freepik & Smashicons from www.flaticon.com is licensed by CC 3.0 BY
Icons made by Freepik & Smashicons from www.flaticon.com is licensed by CC 3.0 BY